 +1 ( 877 ) 255-1022
Aluminum Siding Installation: A Complete Step-by-Step Guide
Oct 27, 2026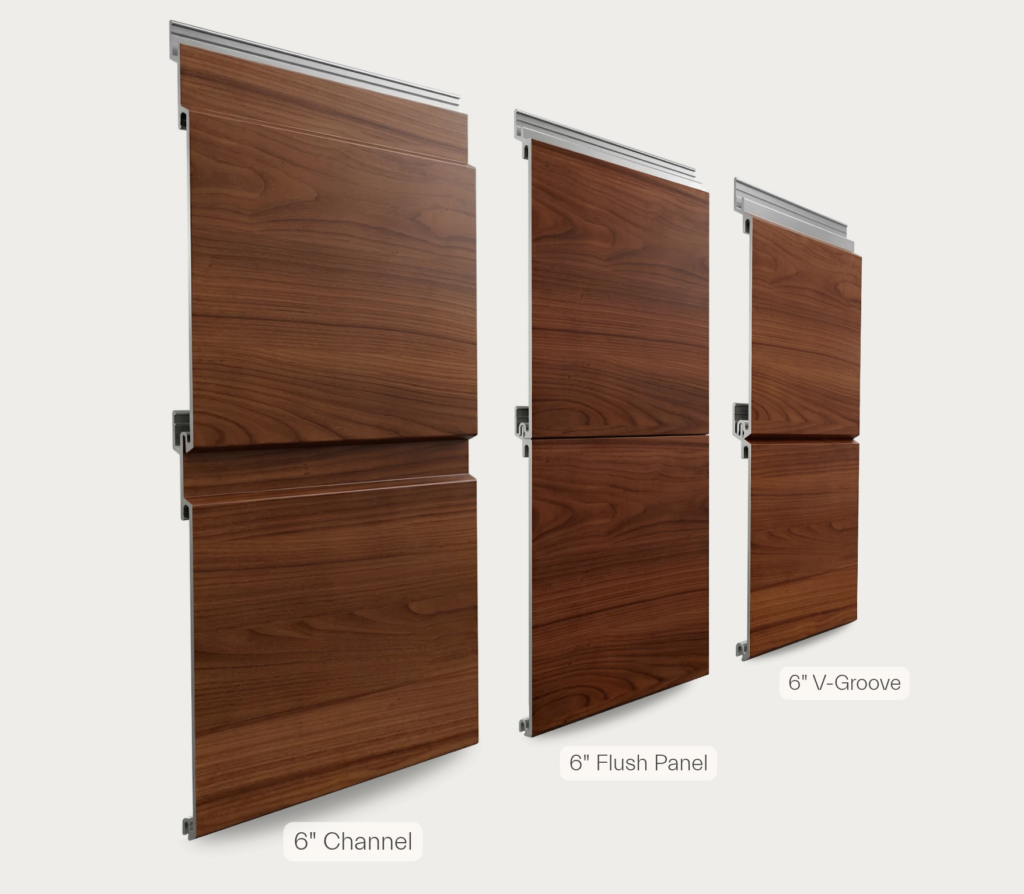
Exterior claddings are witnessing a massive evolution. For years, builders and homeowners were restricted to standard vinyl or high-maintenance real timber. Today, modern architects and general contractors are increasingly choosing architectural aluminum cladding for a clean, non-combustible, and long-lasting exterior finish.
Whether you are refurbishing a heritage elevation or specifying materials for a high-rise commercial build, understanding the core principles of an aluminum siding installation ensures long-term project success and full warranty compliance.
What Makes Aluminum Sidings the Right Choice?
Architectural aluminum siding delivers a superior combination of structural performance and visual elegance:
Safety and Code Compliance: Unlike PVC or wood, extruded aluminum is non-combustible, meeting stringent fire safety standards under Part 9 of the National Building Code of Canada (NBC) and the International Building Code (IBC). This makes it ideal for urban residential and multi-family commercial projects.
Extreme Weathering Performance: Engineered for severe climate conditions, aluminum prevents moisture absorption, rot, fungal decay, and freeze-thaw splitting that cause vinyl panels to buckle or separate.
Maintenance-Free Aesthetics: High-performance AAMA-certified sublimated wood-grain and solid powder coatings eliminate the need for periodic re-staining or repainting every three to five years.
Modern Architectural Profiles
Modern extrusion technology offers a wide range of profile options:
- Sublimated Woodgrains: Replicates the organic grain, texture, and warmth of natural cedar, oak, and dark walnut without the upkeep.
- Textured & Metallic Solids: Provides modern architectural aesthetics across matte, metallic, and fine-textured powder coatings.
- V-Groove, Channel & Flush Profiles: Allows specifiers to alter visual shadow lines across walls, soffits, and transitions.
Step-by-Step Guide for Installing Luxyclad Aluminum Siding
Note: Luxyclad is engineered as a rear-ventilated rainscreen cladding system. Installation requires precision cutting and handling and should be completed by experienced professionals.
Step 1: Planning, Site Preparation, and Tools
Verify that the substrate is clean, dry, level, and structurally sound. Inspect all materials prior to installation.
Required Tools & Hardware:
- Cutting: Compound miter saw fitted with an 80T non-ferrous metal-cutting blade (e.g., DeWalt DW 3229-12″).
- Fasteners: #8 x 1-1/2″ corrosion-resistant pan-head screws.
- System Hardware: Luxyclad Aluminum Rainscreen Clips (included with order), 1″ Precision Starter Strips, J-Trims, Outside/Inside Corner Bases & Caps, and Finishing Strips.
- Layout & PPE: Level, tape measure, chalk line, painter’s tape (for protecting saw cut surfaces), Luxyclad Color-Match Touch-Up Pen, safety glasses, heavy-duty gloves, and hearing protection.
Step 2: Installing Trims and Component Bases
Begin by hard-fastening all foundational trim bases before installing cladding profiles:
1-Starter Strip: Snap a level chalk line at the base of the wall. Fasten the Starter Strip along the line using rainscreen clips spaced 32″ O/C (or 16″ O/C for high-wind areas). Insert an additional screw next to each clip to support the cladding load.
2-Corner & Perimeter Bases: Hard-fasten the Outside Corner Base, Inside Corner Base, and J-Trim Bases around window and door openings. Ensure starter strips do not overlap corner bases and sit flush to maintain a seamless profile elevation.
Step 3: Accounting for Thermal Expansion
Aluminum responds predictably to seasonal temperature changes, expanding or contracting approximately 1/4″ (5.6 mm) per 24 ft (7.3 m) over a 30C temperature swing.
- Always fit profiles to the midpoint of coverage inside trim channels to leave expansion room.
- Fasten profiles at their midpoint to allow natural thermal movement outward.
- Never over-tighten fasteners or hard-fasten both ends of a panel, as restricted thermal movement leads to surface buckling or waving.
Step 4: Panel Installation
1-Horizontal Siding: Engage the female interlock of the first siding profile firmly into the male lip of the Starter Strip. Apply downward pressure while positioning the rainscreen clip over the top hem, then secure with a #8 pan-head screw.
2-Vertical Siding: For vertical applications, begin at the center of the wall using two back-to-back Starter Strips over horizontal or diagonal furring/strapping, building outward in both directions.
3-Continue installing panels sequentially, verifying level alignment periodically. When approaching window edges or corners, trim panels to fit neatly inside J-Trims or corner bases.
4-Exposed Edge Touch-Up: Apply a Luxyclad Color-Match Touch-Up Pen over exposed cut ends to eliminate metal glint and protect raw edges.
Step 5: Finishing Touches & Final Trim
- Terminating Runs: At the top of the elevation or soffit junction, the final siding board may need to be ripped lengthwise. Ensure the board rests securely inside the Finishing Strip Base.
- Snap-On Caps: Using a non-marring tool or mallet, press the decorative Finishing Cap, Corner Caps, and Flat Caps firmly onto their installed bases until completely seated.
- Inspection: Inspect all seams, verify that fasteners are flush, and clean the work area of any metal shavings.
Care and Maintenance
Luxyclad architectural finishes retain their appearance with minimal upkeep:
- Annual Rinse: Rinse siding once a year in the spring with a garden hose to remove road salt, pollen, and dust.
- Mild Cleaning: For heavier grime, wash with a soft-bristled car brush using a mild detergent mixture (1/3 cup powdered laundry detergent + 2/3 cup powdered household cleaner per 1 gallon of water).
- What to Avoid: Do not use pressure washers, steel wool, scouring pads, or acid-based cleaners, as these can permanently alter the finish gloss level.
- Coastal Environments: For installations within 3 miles (5 km) of the ocean, rinse panels every 3 to 6 months to prevent salt spray accumulation.
Inspection, Maintenance, and Repair
The best part about installing aluminum sidings at your home is that you don’t have to do maintenance more frequently. All you need to do is the following things:
- Yearly Washing: You just need to simply wash the siding once a year using warm water, mild dish detergent, or a soft-bristled brush. Avoid using high-pressure washers, steel wool, or abrasive acid cleaners. These products may permanently strip the protective woodgrain layer.
- Repairs: Accidents are bound to happen. If a stray piece of machinery causes a dent on a ground-level panel, you won’t need to tear down the entire wall. Many aluminum sidings are available with a clip-and-snap architectural system, using which a professional can simply unclip the damaged panel through the H-trims and swap a brand new piece without any hassles.
Factors and Estimates to Consider
Initial Material Costs
Premium architectural aluminum is costlier than entry-level vinyl or a generic painted coil stock.
Professional Labour Costs
As the installation requires strict levelling, thermal accounting, and heavy-duty cold-cutting tools, labour can generally account for 40-50% of the total project quote depending on your geographic region and the complexity of the home’s architecture.
Lifetime ROI Calculation
Analyzing the cost solely on day one can be wrong. Maintenance depends entirely on the type of material you’re using. For instance, real wood needs staining at least every 3-5 years. It also needs labour. On the other hand, aluminum sidings require zero maintenance for over 20+ years, which makes them a cost-effective solution available in the market.
Install Aluminum Sidings With Peace of Mind With Luxyclad
Installing aluminum sidings can be an easy process. All you need to do is follow the above mentioned steps, which will help you ensure a reliable fitting that protects your home’s exteriors for decades.
Luxyclad brings you a comprehensive range of aluminum sidings that are made to withstand Canada’s brutal climate conditions. These sidings are available in different styles and colours, making them suitable for your home’s exterior aesthetics. Visit our website now to learn more about our claddings.
Frequently Asked Questions
Can I install Luxyclad aluminum siding over brick or existing substrate?
Yes. Luxyclad can be installed over existing wood, brick, or masonry substrates provided furring/strapping is applied to ensure a flat, structural anchoring plane and proper rainscreen drainage gap.
Should I attempt a DIY installation or hire professional installers?
Because aluminum cladding requires precise cold-cutting, thermal expansion calculations, and specialized rainscreen clipping, professional installation by an experienced contractor is highly recommended to protect warranty coverage.
Does aluminum siding make a building hotter or cooler?
Aluminum acts as a durable protective cladding rather than insulation. As part of a rear-ventilated rainscreen assembly, it allows air circulation behind the panels, reducing direct solar heat gain on the primary wall envelope.
How are damaged panels repaired?
Thanks to the two-piece architectural trim and clip system, individual panels can be unclipped and replaced without tearing down the entire wall assembly.
What specialized tools and fasteners do I need for a clean, warranty-safe installation?
To ensure a precise, professional, and warranty-compliant installation, use the following tools and materials specified in the Luxyclad® Installation Manual:
- Cutting Equipment: A compound miter saw or small table saw equipped with an 80-tooth (or fine-tooth) non-ferrous metal-cutting blade (e.g., DeWalt DW 3229-12″). Do not use tin snips or generic circular saw blades.
- Fasteners & Clips: Luxyclad® Aluminum Rainscreen Clips (included with order) fastened with #8 x 1-1/2″ corrosion-resistant pan-head screws.
- System Trims & Components: 1″ Precision Starter Strips, 1″ Precision J-Trims (Base + Cap), 1.7″ Flat Caps & Bases, and Inside/Outside Corner Bases & Caps.
- Layout & Touch-Up: Chalk line, level, tape measure, painter’s tape (to cover saw tables and prevent surface marring), and a Luxyclad Color-Match Touch-Up Pen to seal cut aluminum ends.
- Safety Gear (PPE): Heavy-duty work gloves, safety glasses, hearing protection, and a dust mask/respirator rated for aluminum particulates.
What Influences Installation Costs?
Profile & Material Selection: Primary cladding profiles (V-Groove, Flush, Channel), finish types (premium sublimated woodgrains vs. solid/metallic powder coats), and the quantity of two-piece architectural trims required.
Architectural Complexity & Height: Elevations requiring extensive miter cuts, complex window/door penetrations, or scaffolding for multi-story builds increase precision labor time.
Substrate & Rainscreen Prep: The condition of the underlying wall and whether horizontal or diagonal furring/strapping is required to establish a flat, rear-ventilated rainscreen drainage plane.
Labor & Professional Installation: Because aluminum cladding requires specialized cold-cutting tools and exact thermal expansion spacing, professional installation typically accounts for 40–50% of the overall project quote.
Long-Term Lifetime ROI: While initial material and specialized labor costs are higher than entry-level vinyl, Luxyclad’s zero-maintenance AAMA-certified finish eliminates periodic re-staining, repainting, and board replacement costs over a 20+ year lifespan.